Board:bcom/winnet100: Difference between revisions
mNo edit summary |
|||
| Line 1: | Line 1: | ||
BCOM WINNET100 Build Tutorial | BCOM WINNET100 Build Tutorial | ||
Note: Preliminary only (its currently not part of the repository). | '''Note: Preliminary only (its currently not part of the repository).''' | ||
This mainboard was sold by IGEL some years ago as their product IGEL-316. Their | This mainboard was sold by IGEL some years ago as their product IGEL-316. Their | ||
| Line 10: | Line 10: | ||
{| style="float: right; background: transparent; padding: 0px; margin: 0px;" | {| style="float: right; background: transparent; padding: 0px; margin: 0px;" | ||
|- valign="top" | |- valign="top" | ||
| [[Image:Igel_winnet100_1.png|thumb|The IGEL WinNET 100 thin client.]] | | [[Image:Igel_winnet100_1.png|thumb|The IGEL-316 (WinNET 100) thin client.]] | ||
| [[Image:Igel_winnet100_2.jpg|thumb|The backpanel.]] | | [[Image:Igel_winnet100_2.jpg|thumb|The backpanel.]] | ||
|- valign="top" | |- valign="top" | ||
| Line 107: | Line 107: | ||
febff000-febff07f : 0000:00:12.3 | febff000-febff07f : 0000:00:12.3 | ||
fffc0000-ffffffff : flash_memory.0 | fffc0000-ffffffff : flash_memory.0 | ||
== Using the hardware with a current kernel == | == Using the hardware with a current kernel == | ||
| Line 131: | Line 130: | ||
To disassemble the PLCC32 boot flash rom you need something with a hook. I'm using my SMD tweezer. Did I mentioned that you will need something to burn your flash? | To disassemble the PLCC32 boot flash rom you need something with a hook. I'm using my SMD tweezer. Did I mentioned that you will need something to burn your flash? | ||
== Required patches == | == Required patches == | ||
Revision as of 19:02, 16 May 2007
BCOM WINNET100 Build Tutorial
Note: Preliminary only (its currently not part of the repository).
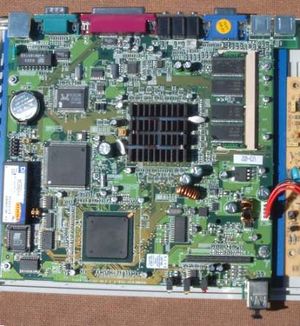
This mainboard was sold by IGEL some years ago as their product IGEL-316. Their product was a Linux based terminal to work remotely with Windows and X.
Hardware
 | |
 |
- GX1-300B-85-20 Cyrix/National/AMD Main CPU with 300MHz core clock
- CS5530A-UCE part of the chipset, Cyrix/National/AMD companion device
- PC97317 Super IO
- RTL8139C Realtec network controller
- 39F020A PLCC32 256kiB Flash memory to boot
- LM4546 National, AC97 AD/DA
- DOC2000 DIL32 16MiB DiskOnChip
- SDRAM 32MiB SDRAM with 133MHz/CL2 capability as SO-DIMM
Connectors (internal and external)
- 1x PS/2 keyboard
- 1x PS/2 mouse
- 1x serial port (COM1)
- 1x Parallel port
- 2x USB (OHCI)
- 1x DSUB15 VGA analouge
- 1x RJ45
- Audio: Line-in, line-out, Mic
- 1x 44pin 2mm 2.5" harddisk connector
Detailed System Information
The following information was gathered on a running Linux 2.6.21 system, booted via LinuxBIOS:
lspci -tv
-[0000:00]-+-00.0  Cyrix Corporation PCI Master
           +-0f.0  Realtek Semiconductor Co., Ltd. RTL-8139/8139C/8139C+
           +-12.0  Cyrix Corporation 5530 Legacy [Kahlua]
           +-12.1  Cyrix Corporation 5530 SMI [Kahlua]
           +-12.2  Cyrix Corporation 5530 IDE [Kahlua]
           +-12.3  Cyrix Corporation 5530 Audio [Kahlua]
           +-12.4  Cyrix Corporation 5530 Video [Kahlua]
           \-13.0  Compaq Computer Corporation ZFMicro Chipset USB
/proc/cpuinfo
processor       : 0
vendor_id       : Geode by NSC
cpu family      : 5
model           : 9
model name      : Geode(TM) Integrated Processor by National Semi
stepping        : 2
cpu MHz         : 300.691
cache size      : 16 KB
fdiv_bug        : no
hlt_bug         : no
f00f_bug        : no
coma_bug        : no
fpu             : yes
fpu_exception   : yes
cpuid level     : 2
wp              : yes
flags           : fpu tsc msr cx8 cmov mmx cxmmx
bogomips        : 602.14
clflush size    : 32
/proc/iomem
00000000-000006d3 : reserved
000006d4-0009ffff : System RAM
000a0000-000bffff : Video RAM area
000f0000-000fffff : System ROM
00100000-01bfffff : System RAM
  00100000-00253ad9 : Kernel code
  00253ada-002a5f2b : Kernel data
40000000-40000fff : scratch_pad_ram
  40000000-40000fff : Geode GX1 Framebuffer
40008000-400080ff : bus_interface
  40008000-400080ff : Geode GX1 Bus Interface
40008100-400082ff : video_pipeline
  40008100-400082ff : Geode GX1 Framebuffer
40008300-400083ff : display_control
  40008300-400083ff : Geode GX1 Framebuffer
40008400-400084ff : memory_control
  40008400-400084ff : Geode GX1 Memory Control
40008500-40008fff : power_control.0
40400000-407fffff : smm_area.0
40800000-487fffff : video_memory
  40800000-487fffff : Geode GX1 Framebuffer
febfb000-febfbfff : 0000:00:12.4
  febfb000-febfbfff : Geode GX1 Framebuffer
febfc000-febfcfff : 0000:00:13.0
  febfc000-febfcfff : ohci_hcd
febfd000-febfd0ff : 0000:00:0f.0
  febfd000-febfd0ff : 8139too
febfe000-febfe0ff : 0000:00:12.1
  febfe000-febfe0ff : CS5530a (Kahlua) SMI handler
febff000-febff07f : 0000:00:12.3
fffc0000-ffffffff : flash_memory.0
Using the hardware with a current kernel
The current 2.6.21 kernel does not know the cs5530 interrupt router. So it is impossible to let the kernel itself setup PCI's interrupt routing. Even if you provide the kernel with a valid interrupt routing table (PIRQ). No interrupts will work as the interrupt routing registers are still left at their reset values. The small patch below solves this issue (it was rejected in mainline as it breaks various standard BIOS based Geode system, as they where shipped with broken PIRQ tables).
How to bring LinuxBIOS in
I was not successfull to boot anything other than the software in the DOC to get some information about this board. It seems a very special BIOS as it only outputs "booting os" and nothing else. Then the splash screen comes up and the graphical environment starts. One or two times I was successfull to run an update of this firmware. Because the update process fails (the server it tries to connect to doesn't answer anymore), the console comes up. That's why I know they run a 2.4 kernel with an XFree86 3.x. Their software needs about one and a half minute to boot up and supports graphical resolutions upt to XGA@64k colours and SXGA@256 colours.
With my own implementation (LinuxBIOSv2, Linux 2.6.2x kernel, Xorg 7.2) I boot this machine in about 10 seconds, then the xdm dialogue occures (its a terminal, not a workstation) and supports also SXGA@64k colours.
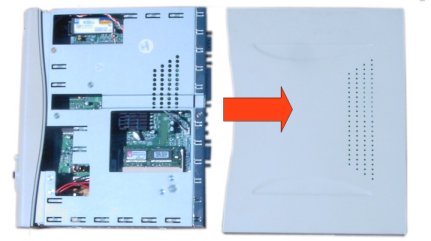
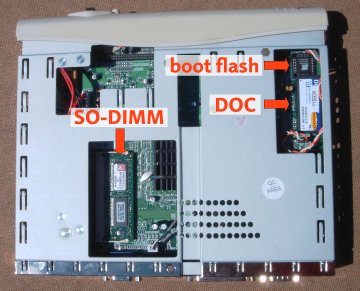
As is it hard to get a console on this system with the original software, I found no way to reprogram the boot flash in a running system. But it is very easy to disassemble the flash memory. Only 3 screws to unscrew at the reverse.
Pull the front panel to one side, the casing to the other. Ready. You now have access to all relevant parts.
To disassemble the PLCC32 boot flash rom you need something with a hook. I'm using my SMD tweezer. Did I mentioned that you will need something to burn your flash?

